Saturday, October 8, 2011
Be Back Soon
Sorry for the long delay in post, currently planning a gaming convention and buying a new house so my free time to book bind has been limited. hoping to get back in the studio soon to finish out this project.
Friday, September 9, 2011
Deadlands Savage Worlds Custom Binding Part 3
So now for the cover. For this treatment I am going to do a single piece raw vegetable tanned leather cover. This is a bit of an experiment for me so you get to come along for the ride. Most of the embossing I have done to date has been very detailed work that did not involve stamping the leather. For this cover I am also using a plug which is a mold put under the leather to give it greater depth.

By raising the cow skull up it allows me to add an embossed layer for the gun and hatchet detail.
 I next added a basket weave boarder to frame it in.I will repeat this pattern on the back of the book as well. It still needs some corner details to balance it all out but I have not decided on a final design yet.
Next I will finish out the embossing and fit the leather to the book and form the spine.

By raising the cow skull up it allows me to add an embossed layer for the gun and hatchet detail.

Next I will finish out the embossing and fit the leather to the book and form the spine.
Saturday, September 3, 2011
Deadlands Savage Worlds Custom Binding Part 2
So I printed out all signatures and folded everything. Now it needs to be punched and sewn together. I recently got a punch cradle and it does make things faster and easier but it is not a required piece of hardware.


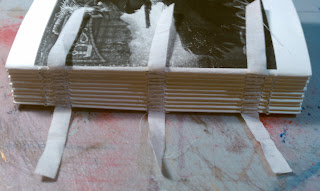

You need to ensure that each booklet is punched in the same exact location so I built a template from a scrap of card stock. There is no hard and fast rule for how many holes you will want but I prefer to have three support straps sewn in so that means eight holes. Two for each strap and two more for anchor points to connect the booklets together.


Next it is just a rinse and repeat process of using an awl to punch holes through each of the signatures.
Once the signatures are punched they need to be stitched together. To help hold everything together and add support to the binding you need to sew in binding strips. You can buy specific strips of cloth for this from a book binding supply house but I just cut strips of muslin. Any natural fiber will do but I would suggest a light weight white cotton.
Next you need to sew the binding strips and signatures together. there are a lot of videos on you tube that will show you this Binding process so I will skip it here. While it it is not strictly necessary to have a sewing rig I would highly recommend one since it is extremely difficult to keep thing tight and even without one. They typically cost about $150-$200 to buy but with a little effort you can easily make one yourself.


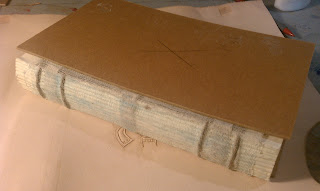
Once it is all sewn together. I added a thin mesh backing material and applied a liberal coating of glue and pressed the book and let it dry.

Next time we start working the leather cover...
Tuesday, August 30, 2011
Deadlands Savage Worlds Custom Binding Part 1
Well it took some time to get back to the blog but I finally got back to the workbench. My new project is going to be a PDF print hand stitched half book of Savage World Deadlands. I have done this with other books, Hunter, and D&D 4th edition which I gave away as a raffle prize at my local convention. last year.


A half book consists of Printing a normal 8.5x11 book on a half page. For Deadlands I printed 10 page booklets on light tan cotton fiber resume paper. I really liked the antique appearance the paper and B&W print gave to the subject matter. I use a duplexing laser printer using a booklet printing option. It is a quick way to put a PDF into a book format. It does leave a fair amount of space at the top and bottom of the page but this is mitigated a bit when we trim the book up.


In the next installment I will talk about punching and stitching it all together.
Tuesday, June 7, 2011
DO Pilgrims of the Flying Temple Part 7
This should be the last post in this series so if you don't want to see the final product for some reason avoid this post.
The covers are embossed and stained. The holes have been drilled all that is left is to sew it all together. I am using a heavy twine for the binding because I liked how it contrasted with the shinny snake skin.
 There are an endless number of stitching patterns you can use for a Japanese bindings, just do a Google search and you will find instructions and patterns for just about anything you may want to do. I did a fairly simple six hole stitch but did it in a away to leave about a two inch gap in the middle. You will see why a little further down. Because I am using a heavy twine the holes I drilled need to be fairly large because with this pattern The twine needed to pass through the hole three times.


Because the holes are large and I wanted to add some embellishments I used turquoise rivets to fill the holes. I also added a decoration in the gap made from a Chinese coin and a smaller turquoise rivet.

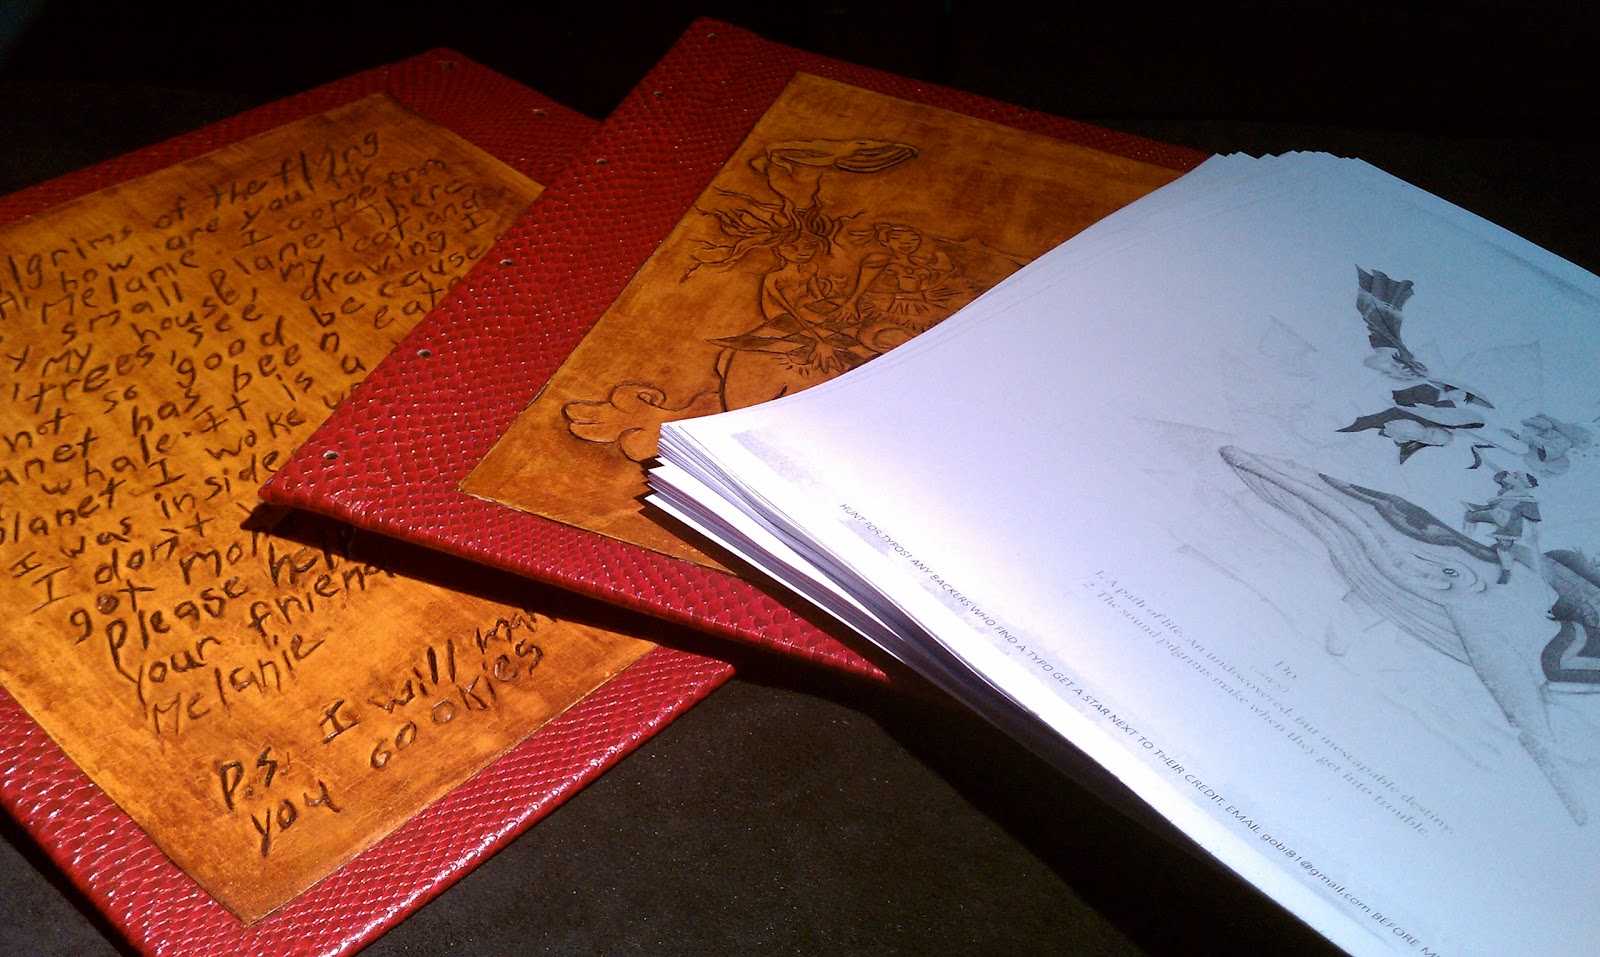
The final step is to add end papers. Daniel Solis, author of DO Pilgrims of the Flying Temple gave me access to a library of images. One included a page filed with various hand written "Pilgrims of the Flying Temple" phrases. I thought these would make excellent end sheets. Since this just a mock up I put them in temporarily to show you what the final output will look like. When this done for real the end papers will be glued in before the book is sewn together.


So here are the final shots of the completed book. Still working on my camera work so the color is a little off but I like the final product.


My final choices for the design were based on a few factors. As with all the RPG's I bind I try to incorporate ideas that reflect the nature of the game. DO is very whimsical and involves travel to strange worlds solving bizarre problem. The game is driven by letters written to the temple for help. I picked a story that is used to introduce people to the game. The story on the back was written by a 9 year old girls who needs help because her planet was eaten by a whale. I recruited my nieces to write the letter to ensure that the script did not look forced or fake. They also helped out with the drawing. The front cover is my idea of what the scene might have been before the whale swallowed the little girls planet.
I had fun with this project and blogging as I went along was something new for me. Origins is around the corner so will not be back to the blog for a little while but I would be interested in hearing some comments? Was this interesting to anyone besides me? Does anyone have any questions? See anything on my flicker page that you have questions about?
I am sure I will be doing more of these for future projects and I tweet when ever a make something new so follow me if you would like updates.
The covers are embossed and stained. The holes have been drilled all that is left is to sew it all together. I am using a heavy twine for the binding because I liked how it contrasted with the shinny snake skin.


Because the holes are large and I wanted to add some embellishments I used turquoise rivets to fill the holes. I also added a decoration in the gap made from a Chinese coin and a smaller turquoise rivet.

The final step is to add end papers. Daniel Solis, author of DO Pilgrims of the Flying Temple gave me access to a library of images. One included a page filed with various hand written "Pilgrims of the Flying Temple" phrases. I thought these would make excellent end sheets. Since this just a mock up I put them in temporarily to show you what the final output will look like. When this done for real the end papers will be glued in before the book is sewn together.


So here are the final shots of the completed book. Still working on my camera work so the color is a little off but I like the final product.


My final choices for the design were based on a few factors. As with all the RPG's I bind I try to incorporate ideas that reflect the nature of the game. DO is very whimsical and involves travel to strange worlds solving bizarre problem. The game is driven by letters written to the temple for help. I picked a story that is used to introduce people to the game. The story on the back was written by a 9 year old girls who needs help because her planet was eaten by a whale. I recruited my nieces to write the letter to ensure that the script did not look forced or fake. They also helped out with the drawing. The front cover is my idea of what the scene might have been before the whale swallowed the little girls planet.
I had fun with this project and blogging as I went along was something new for me. Origins is around the corner so will not be back to the blog for a little while but I would be interested in hearing some comments? Was this interesting to anyone besides me? Does anyone have any questions? See anything on my flicker page that you have questions about?
I am sure I will be doing more of these for future projects and I tweet when ever a make something new so follow me if you would like updates.
Tuesday, May 31, 2011
DO Pilgrims of the Flying Temple Part 6
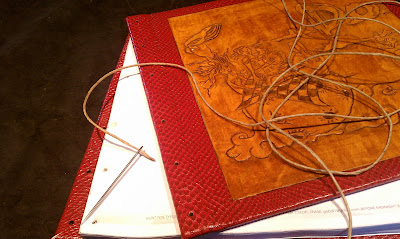
The embossing and dying is done and now need start to pull it all together. This is going to be a Japanese or Stab binding so it will not have a traditional spine. Rather it will be sewn together through holes "stabbed" through the cover and pages. Youtube is full of great example of how to do a stab binding if you are looking for a more detailed description.
I have printed out a pdf of the preview copy so I can work out the final design. The final product will use the final print version with the spine cut off.

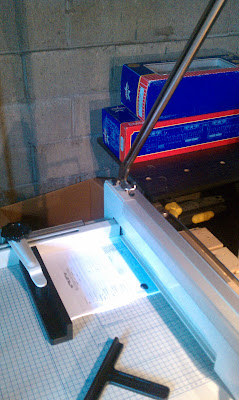
One of my newest tools is a heavy duty guillotine paper cutter. If this is something you want to do on a regular basis I suggest you pick one up. If not you can go to a Kinkos to have them do even spin cuts or with a steady hand, a sharp Exacto, and a strait edge you can cut through the layers by hand. I used my cutter to square my printout to 8.5x8.5.
Making sure that your holes line up and every thing is square is critical to making sure things comes out even at the end. I start by making the holes on one of the covers and using that as a template for everything else.
Using a leather punch I put a hole strait through to the other side. I then clamp the back cover to the front and punch through the back cover.Now the front and back cover have aligned and even holes.
 I then line up the sheets and clamp the front cover to them. With a sharp pencil I mark the sheets below.

Very carefully remove the cover, keeping the pages clamped together. The pages are too thick to punch through so it is off to the drill press. My second most valuable tool is my Dremel with the drill press stand as an added option. You can attempt this without using a drill press but it is very difficult to keep the hole straight without one. When drilling through sheets of paper be careful not to go too deep too fast or you sheets will catch on fire.


Next time we sew it all together and put on the final touches.....
I have printed out a pdf of the preview copy so I can work out the final design. The final product will use the final print version with the spine cut off.
One of my newest tools is a heavy duty guillotine paper cutter. If this is something you want to do on a regular basis I suggest you pick one up. If not you can go to a Kinkos to have them do even spin cuts or with a steady hand, a sharp Exacto, and a strait edge you can cut through the layers by hand. I used my cutter to square my printout to 8.5x8.5.

Making sure that your holes line up and every thing is square is critical to making sure things comes out even at the end. I start by making the holes on one of the covers and using that as a template for everything else.
Using a leather punch I put a hole strait through to the other side. I then clamp the back cover to the front and punch through the back cover.Now the front and back cover have aligned and even holes.


Very carefully remove the cover, keeping the pages clamped together. The pages are too thick to punch through so it is off to the drill press. My second most valuable tool is my Dremel with the drill press stand as an added option. You can attempt this without using a drill press but it is very difficult to keep the hole straight without one. When drilling through sheets of paper be careful not to go too deep too fast or you sheets will catch on fire.


Tuesday, May 24, 2011
DO Pilgrims of the Flying Temple Part 5
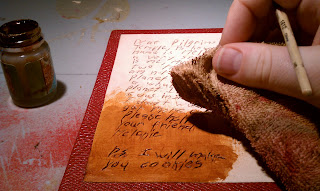
Now we move on too dying the leather. Below is a picture of some of the products I use, Eco-Flo and Fiebing's leather dye. Both are water based so they dry very quickly. The Eco-Flo is thicker and is much better for blending with other colors and can create more natural patters and streaks. The Fiebing is very good at even penetration and can produce a very even coloring. I tend to prefer the eco-flo because its ability to blend with other colors and it pools well on the embossed leather providing added depth. For this project I used a single light tan eco-flo dye.

With all dyes the longer it sits on the leather the deeper it will penetrate and the darker it will be. When applying dye you want to apply it with a soft cloth in a circular pattern for an even distribution of color. To ensure the dye penetrated into the embossing I apply a heavy coat and lightly wipe away the excess.

Once your project is dyed you need to seal it. water based dyes will run if you get them wet. While it can be a cool effect it is annoying to get covered in ink every time it rains. There are several ways to seal leather and I have pictured a few below. Eco-Flo has a water based sealant that will produce a satin finish, Fiebing makes a liquid wax the can be polished to a high shine, or you can just use bee's wax and some elbow grease. For suede and pre-dyed leather I also use a spray sealant the you would use to seal leather boots.
 My personal favorite and the one I use 90% of the time is the Atom wax. It is easy to apply, dries quickly, and can be polished to various levels of shine. Also depending on how long you let the dye dry before applying you can produce some nice aging effects.
 For this project I applied two coats of the wax letting it dry between applications and I made sure the dye was very dry. If you apply it when the dye is still drying you will get a streaked effect that I wanted to avoid with this project. Once the wax dries I used a soft rag and some elbow grease to polish the surface to a medium shine.

Next time we talk binding and pulling it all together...

With all dyes the longer it sits on the leather the deeper it will penetrate and the darker it will be. When applying dye you want to apply it with a soft cloth in a circular pattern for an even distribution of color. To ensure the dye penetrated into the embossing I apply a heavy coat and lightly wipe away the excess.


Once your project is dyed you need to seal it. water based dyes will run if you get them wet. While it can be a cool effect it is annoying to get covered in ink every time it rains. There are several ways to seal leather and I have pictured a few below. Eco-Flo has a water based sealant that will produce a satin finish, Fiebing makes a liquid wax the can be polished to a high shine, or you can just use bee's wax and some elbow grease. For suede and pre-dyed leather I also use a spray sealant the you would use to seal leather boots.


Next time we talk binding and pulling it all together...
Subscribe to:
Posts (Atom)